Showing posts with label 14 days of valentine's. Show all posts

February 13, 2012

Day 13: A Valentine's Day Outfit

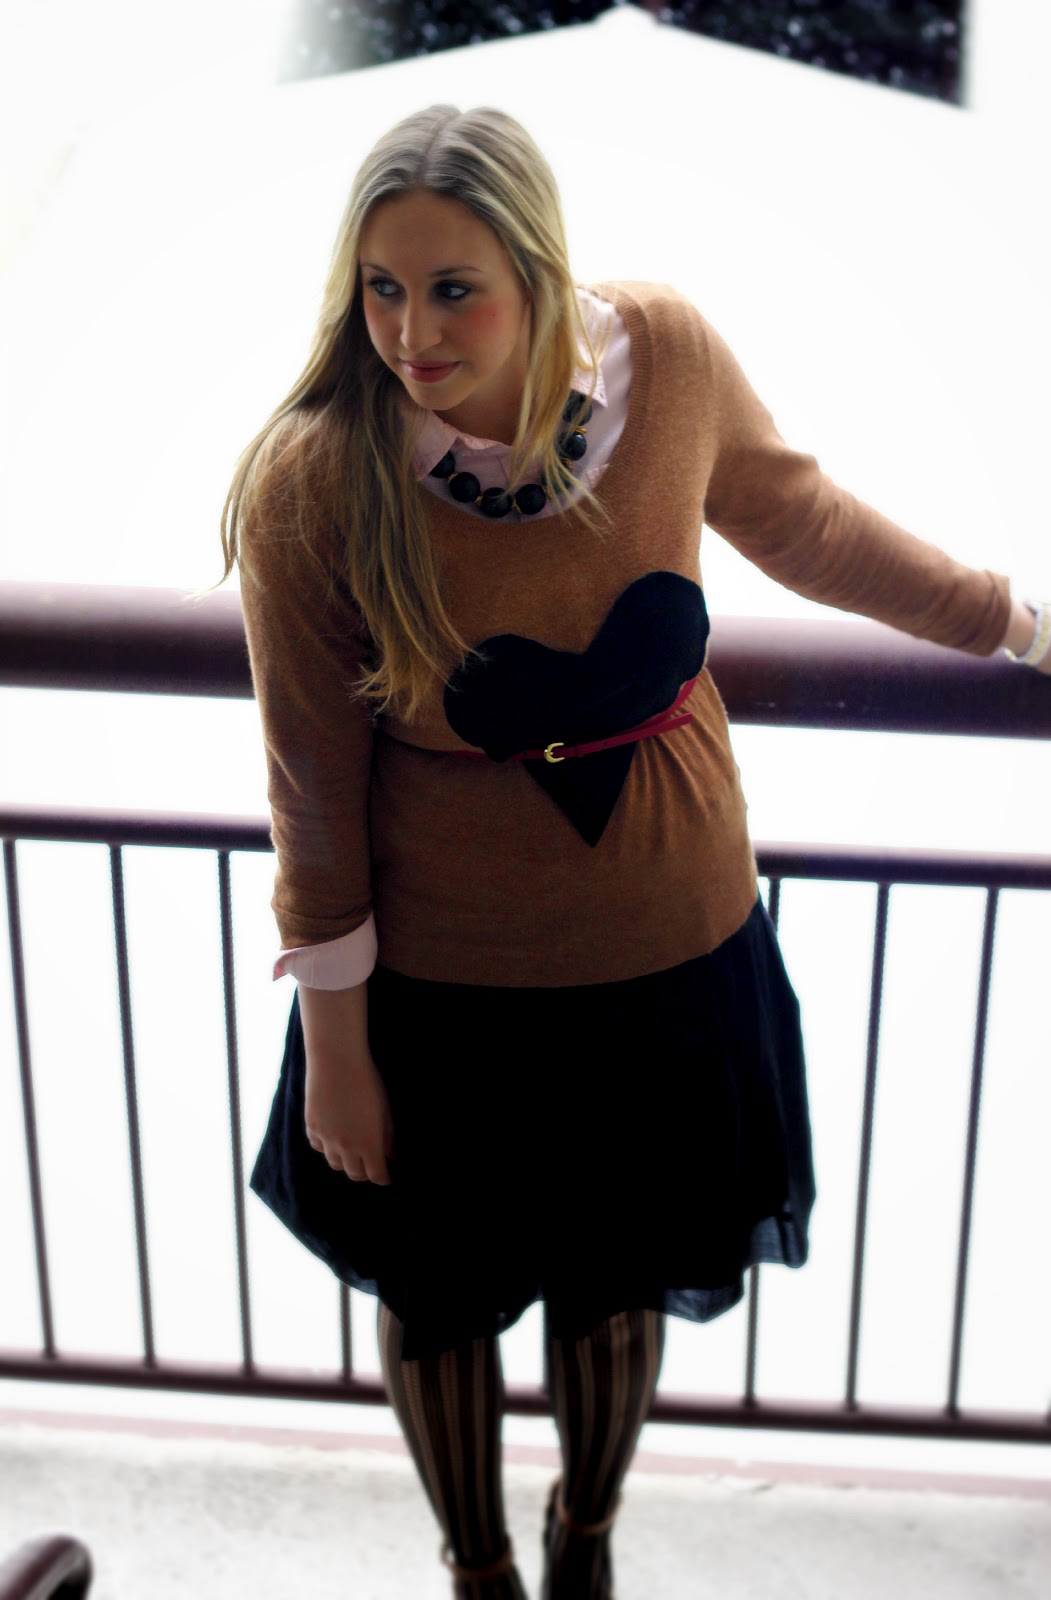
Call me crazy, but I've worn this sweater three days in a row now. I decided to take a break for today, but I can't help thinking that I'll probably wear it AGAIN on Valentine's Day.
I'm a freak.
As much as I love a good pencil skirt, there's something about a fuller skirt that I just adore. Maybe it's because it adds a girlier feel to an outfit, or that it can dress up an outfit without looking too formal. Either way, between the sweater and one of my favorite skirts (I've had it since I was 17), my new shoes and a fun pair of tights, I'm ready for love day.

And I'm also ready to start blogging about real life things again too! As much fun as these last two weeks have been (for me at least), a lot has happened and I want to share it all with you! 
So starting Wednesday, I'll be back to blogging about our V-Day festivities, my birthday plans, a trip to a tree, the superbowl, and all the other craziness that has been our life in the first two weeks of February. 
 
I'm a big fan of mismatching pinks. I thought this belt (a $3 find at F21 mind you) added a brighter touch to an otherwise neutral outfit.


Resorting back to taking photos in the comfort and warmth of our home. And I can't wait until we get our own furniture when we move in July. No more purple couches!


On my wish list all Winter, I finally cracked and bought these shoes on sale at Nordstrom (found here) the other week. I want to wear them everywhere. They have a nice chunky heel, so I never feel off balance or too high off the ground.
Target/DIY sweater, Ralph Lauren button down, DownEast skirt, Gap tights, Sam Edelman heels, Forever 21 necklace and belt, Fossil watch

February 12, 2012

Day 12: DIY J.Crew Heart Sweater

I saved one of the the best crafts for last. Well not last, but close to the end of the 14 Days of Valentine's. 
Remember this sweater?
That one from J.Crew that was totally perfect, but also totally out of my price range?
Well, the other day, I added up the amount of money it would cost me to buy everything at J.Crew that I currently want.
The price was scary (like over $1,000 scary), and unrealistic.
But if I even want to come close to buying just a few of those items that I want (not $1000 worth I promise you that), I figured I'd better start saving now, and DIYing a few more things.

I got the idea to make my own J.Crew heart sweater from Sarah, who made her own after being in a situation similar to mine: we both didn't want to pay $90 for a sweater we could make ourselves!
So with the help of my darling friend Eliza, two camel colored clearance sweaters from Target and some black felt, we made a darling sweater that can be worn all winter long (not just for Valentine's Day). 

DIY J.Crew Heart Sweater:
 What you'll need:
One sweater (We bought ours here for $12 each), We used a camel color, but J.Crew did camel with a black heart, red with a pink heart, and navy with a green heart.
A large sheet of felt (we did black)
Black thread
Pins
Scissors

Cut out a large heart to fit your sweater by folding your felt in half, and drawing a one-sided heart in order to make it even. Cut out the heart, unfold, and pin onto your sweater.


The next step is a no brainer. Sew your heart onto your sweater! You could hand stitch or use your sewing machine. We used a sewing machine to save time. 


Cut off your extra threads...

And there you have it! A perfectly darling J.Crew replica made for about $15. The savings? Close to $75. Plus, they are all sold out online (I'm pretty sure they're not making it anymore). 
You could wear this sweater all fall and winter. Seriously though I'm obsessed with it. 
Outfit post with it coming tomorrow! 

February 11, 2012

Day 11: V-Day on a Dime by Guest Blogger Melissa

 I'm so excited to premiere one of my favorite friends of all time! I was so honored that she agreed to guest blog for me, she always has such great writing on her own blog, and I knew she would create a little post for me.

Melissa writes for Love, MDC. Please check it out, I know you'll love it!

This Valentine's Day, I had the highest expectations. I was going to to make my own and use glitter and doilies and sparkly pens. If I didn't make them, I was going to buy the cutest vintage ones like these:


Vday 1


Vday 2


But that didn't happen. Between midterms and one too many trips to Target my week and my bank account were spent. But luckily, Pinterest came to the rescue. I found some free printables, so you can make your own valentines without breaking the bank or spending a lot of time.


It looks like Valentine's Day is saved after all.

-Melissa


February 10, 2012

Day 9 & 10: All About Food

Once again I'm behind (leave it to me), but I'm happy to say that this post is all about food. And there is really nothing better than that. 
Before I get to day 10's recipe, I want to talk about day 9.
Yesterday (day 9) I was going to talk to you about a Valentine's Day dinner menu.
So I'm just going to talk about it now. 
Since my birthday is one week after Valentine's day, Chin and I tend to go low-key on good old V-day, simply because I'm a big fan of fancy birthdays. Anyways, last year instead of spending big bucks to go out to dinner on Valentine's day, we planned something a little different.

 For my gift to Chin last year I sent him a personalized invitation to a 4 course dinner at home. We dressed to the nines and even though the ingredients were a little pricy, we saved about $20-30 more than we would have if we had gone to a restaurant. 
And the night ended up being perfect. We ate on the floor, basked in candlelight, and sipped on Martinelli's. I made Parmesan-Artichoke Crostini, Slow-Roasted Tomatoes, Creamed Spinach, Pepper-crusted Filet Mignon, and  chocolate mousse. The end result? A night of pure bliss in the comfort of our home.

We decided to make it a tradition! This year, I decided to go with another traditional menu. I'm going to be making a salad of some sort, Roasted Asparagus, Homemade spaghetti and meatballs, Fresh Garlic Bread (no store bought bread for us), and the same Chocolate Mousse (it was too delicious and easy to not make at least one more time). 

I highly recommend trying a night in on Valentine's Day. If not this year, maybe next. And let's be honest, most men would love a simple meal that just takes a little bit more effort. It's one of the easiest and best ways to show them you care.

And now, onto day 10!
I was really looking forward to making heart shaped cinnamon rolls this year. I had seen some tutorials around Pinterest... but I am sad to report that it is a lot harder than it looks.

But no matter! You'd probably be better at making them than me anyways, and the recipe for the rolls themselves are too good not to talk about. 

I used Pioneer Woman's Cinnamon Rolls 101 recipe, and I don't think I'll use another one again. The rolls were melt in your mouth gooey and ooey and divine. I used a simple cream cheese glaze instead of her maple icing, and the result was better than that Tory Burch bag that I want. 

I hope you try to make these heart shaped cinnamon rolls, and if not heart shaped, at least the regular ones. Nothing says "I love you" like 334978 calories all rolled up into a roll!

Heart Shaped Cinnamon Rolls
One recipe of Pioneer Woman's cinnamon rolls, made just until the dough is rolled out and sprinkled with butter, cinnamon, and sugar (or your favorite recipe)
Your favorite icing
dental floss (for cutting the rolls)

Take your rolled out, prepared dough, and instead of rolling up one side to the other, slowly begin to roll up both sides to the middle. It should kind of look like a scroll, and the rolled up sides will meet in the middle. 
With your dental floss, cut pieces of the dough to make about inch thick rolls. Pinch the bottoms of the rolls together to make heart shapes, then place on greased cookie sheets. Bake at 375 for about 20 minutes, or until rolls are golden. 
Pour your icing over the rolls and let cool and set up, and let the icing sink into the rolls.

Enjoy!


February 8, 2012

Day 8: Make an Easy Valentine's Table

A few weeks ago, I had some of my girl friends over for dinner. I've gotten really close with them over these last two semesters, and it just seems natural now to weekly have them over for some get-together. 
It wasn't even February yet and I still decided that for some reason I needed to incorporate as much pink and red as possible (can you be addicted to a holiday? I know you guys hate me). 
I used all my resources on hand, and ended up making a relatively festive table that was easy to do.
I thought it would be fun to share some quick and simple ideas for you, just in case you break out the silverware for a Valentine's Day dinner party!
 

The cupid napkins were made by my mother... But do you know how simple it is to make your own napkins? Sewing a square is easy, and JoAnn's or Ikea has lots of great Valentine's Day fabric.  

On bottom, I used a burlap tablecloth, and then the pink heart table cloth and the checkered table runner were both made by my mother. Gosh that women. But they are easy to make! It's like making a really big napkin.

For a little switch up of dinner goblets, buy mason jars at your local thrift store (I bought 20 at D.I. for $3!) and use them for your drinks. You can tie a little twine or yarn around, and I used left over paper gray and red striped straws from a baby shower (bought off etsy for super cheap!).

Pink striped dessert napkins may not seem like a cute decoration for your table, but sitting in a silver napkin holder, it added a fun whimsical feel to the table.

The main focal point was my red lantern from Ikea, purchased last year. It added a little bit of a modern vibe, and once the candles were lit, it added a perfect glow to the evening.

The final product!

However you decide to decorate your Valentine's Day table, make sure it reflects your style. And remember, you don't have to spend a fortune to make it look pretty!

February 7, 2012

Day 7: A Love Playlist by Guest Blogger Tara

I'm so excited to have Tara guest posting for me today! I've looked up to her for a long time (she's practically like a sister!). Tara graduated from BYU's PR program, and has always been a role model in my life. Plus, she's just so cool. She always knows what's the latest and greatest, and she has great style. Be nice to her and enjoy her words!

_________________________________________ 

hello hello!


i'm tara, and i blog over at blogs by tara (and i also have a new running blog, monster feet), but i tweet a lot more than i blog (follow me!!). i live in philadelphia, by way of upstate new york and provo, utah. i've known hayley since she was just a little young thing, and her blog is a not-so-secret love of mine. i was delighted when she asked if i would guest post for this fun v-day series, and i hope you enjoy what i have to share!


i'm so excited to spread the word about one of my favorite times of the year, a fun celebration known as "love week." my amazing friend lindsay coined the term during our freshman year at BYU (05-06...i know, i'm OLD) as a way to bridge the time between her birthday, february 8th, and valentine's day. since then, i've been celebrating love week no matter where i live.


celebrating love week is pretty simple:

  • wear at least one of the official love week colors every day: red, pink, white, purple, and brown (for chocolate!)
  • love everyone
  • no moping about being single - it's about loving your friends and family, too!
  • listen to the love week soundtrack every day
(via)
i have so many great memories of love weeks past. in its inagural year, my entire floor woke up on valentine's day to roses and chocolate from the boys in our ward who were all in on the fun. in 2007, lindsay and i made dozens of those sliced pillsbury cookies and walked around provo delivering the cookies and the yearly soundtrack to all of our friends. in 2009 we spent an entire day compiling the soundtrack, burning cds, and started the week off with a soundtrack release party, complete with a step-and-repeat background and subsequent photoshoot.


lindsay always ended the week with her "finale outfit," that usually included her trademark red velour tracksuit, a pink shirt, and lots of red, pink, and gold heart shaped jewelry. along with her trademark crazy curly hair and one-of-a-kind contagious laugh, you couldn't help but feel the love.


as you can tell, love week holds a very special place in my heart. although i'll most likely be single on v-day this year, love week gives me (and you!) the opportunity to remember that we can give and find love to and from so many people in our lives.


with that, i present to you the 2012 LOVE WEEK SOUNDTRACK! i hope you enjoy it, listen to it daily, and wear it out just like i wore out my backstreet boys CD in 1999 from too many spins around the discman ;).


there are two ways to listen - through this spotify playlist OR my youtube playlist. i suggest the youtube version, since it has some songs/versions that i couldn't add on spotify.


  1.  the power of love - huey lewis and the news
  2. 5 years time - noah and the whale
  3. how sweet it is (to be loved by you) - james taylor
  4. always - atlantic starr
  5. we found love - rihanna
  6. you've got the love (the xx remix) - florence + the machine
  7. perfect for me - ron pope
  8. lover to lover - florence and the machine
  9. sunday kind of love - etta james
  10. you are the one i love - jon mclaughlin
  11. the book of love - the magnetic fields
  12. crazy love, vol. 2 - paul simon
  13. love on top - beyonce
  14. lonely boy - the black keys
  15. falling in love at a coffee shop - landon pigg
  16. got it good - jem
  17. drunk on love - rihanna
(p.s. see past years' soundtracks here and here!)


i would LOVE to hear your favorite love songs as well, so leave them in the comments. happy love week to all!!

February 6, 2012

Day 5&6: A Manicure & Red Velvet Cupcakes

So... I missed day 5 yesterday! Yeah about that. Between sleeping in until early afternoon, church, and the superbowl... this little bloggy got left behind.

But no worries, I consolidated day 5 and 6 for today. Don't fret my pet.
Anyways, Happy Monday! I'm currently laying in my bed listening to this song on full blast on repeat until for um EVER.
They play it at Zumba and I might be that crazy girl who goes to Zumba, but I kind of love it. 
 
So let's talk Valentine's. Are you sick of it yet? Sorry I'm not sorry.

I did this manicure the other day, inspired from Cupcakes and Cashmere (as always), and I really loved how it turned out. It wasn't your typical red and pink color scheme, but still feminine with a touch of fab. And doing one nail a different color adds so much to a paint job! 
What I used:
China Glaze "Icicle"

You know the rest... I used an OPI base and top coat, Ballet Slippers for all my fingers except my ring finger, then used Icicle for my ring finger.


And now onto the delicious part of this post. Last year I made red velvet cupcakes. And while they looked pretty with pink frosting and non-perils, they tasted like rocks. I had the nerve to serve them to a few people, who proceeded to ask if they were BRAN FLAVORED. I don't do bran flavored anything. I haven't tried to make them since, only because it was so embarrassing and not worth the effort. 
I finally got the courage to try them again, with the help of a few baking-expert friends. And they turned out great! The recipe was not difficult to follow and made pretty cupcakes perfect for any Valentine's Day treat.

Red Velvet Cupcakes with Cream Cheese Frosting
Adapted by Lion House

For the cupcakes:
2/3 c. shortening
1 1/2 c. sugar
2 eggs
1/4 c. red food coloring
4 Tbsp. cocoa powder
1 tsp. salt
2 tsp. baking soda
2 1/4 c. all-purpose flour
1 c. buttermilk
2 tsp. vinegar
1 tsp. vanilla

Preheat your oven to 350 degrees.
In a large bowl or the bowl of your electric mixer, cream the shortening on medium speed. Add the sugar and beat until light and fluffy. One at a time, add your eggs, mixing well after each addition. Scrape down the sides if necessary. 

In a separate small bowl, combine the food coloring and cocoa powder to make a paste. Add the paste to the shortening mixture and beat until well combined. 

In another small bowl, combine the dry ingredients (flour, salt, baking soda) and set aside. In ANOTHER (not conducive to an easy cleanup) small bowl, combine the buttermilk, vinegar, and vanilla. 
Starting with the dry ingredients, add half of the dry ingredients to the batter, then with mixer on low, combine until just incorporated. Add the buttermilk mixture and combine until just incorporated. Add the remaining dry ingredients and beat on low until the batter has just come together.

Pour batter into your prepared cupcake tins, about 2/3 full. Bake for 18-22 minutes. Let cool completely.


My baking beauty.


For the Frosting:
2 8-oz. packages cream cheese, softened
1/2 cup (1 stick) butter, room temperature
5 cups powdered sugar
1 tsp. vanilla

In a large bowl or the bowl of your electric mixer, beat the cream cheese and butter until light and fluffy. Reduce the speed of your mixer/hand mixer and slowly add the powdered sugar one cup at a time. Add the vanilla and then beat until fluffy and creamy. Pipe or spread over cooled cupcakes. 


 Hey I heard you were a wild one.

February 4, 2012

Day 4: Heart Covered Wax Paper

Remember those fun tea bags from like what, 3 days ago? 
Well, if you want to wrap those up, or any Valentine's Day treat for that matter, this is the way to do it.
This is the cheapest, easiest craft possibly of them all that I'm sharing.
And it ends up being so cute and festive!
I know I say that about all my crafts.

Heart Covered Wax Paper
What you'll need:
Heart puncher (or you could cut out hearts by hand)
1 roll of Wax Paper
Red tissue paper 
Iron and Ironing board

1. Punch/Cut out several hearts out of your red tissue paper.
2. Lay out your ironing board and turn your iron onto medium heat.
3. Cover your ironing board with paper towels.
 

4. Cut out two pieces of wax paper (the same size), and on one piece of the wax paper, distribute the hearts evenly over the paper. 
5. Cover with the other piece of wax paper to sandwich the hearts, and place the papers onto the ironing board.
6. Cover the paper with more paper towels, then iron over the paper towels. The wax paper will melt together and become one paper covered with hearts!

Use your heart-covered wax paper to wrap up gifts (like teabags)...


Or use it to wrap up treats!

Can you seriously resist these?

Happy Saturday!